How to Create a new project in Angular 15 | Create Angular 15 First application

 We know angular 15 is released in November 2022, so now in this article, we will see how to create an Angular 15 project.

See the Angular15 new features Article Link or Angular15 features Video link.

If you have already worked with angular previously we know, angular CLI helps us to build an angular application. Creating a new project in angular is now as simple as installing the Angular CLI and running the ng new command.

What is Angular CLI

The Angular CLI helps us to create an Angular application and it uses Typescript, it creates an angular application with all the configuration files and the packages in one single command.

It helps us to add features (components, pipe, services, directives, etc.) to existing or new Angular applications.

How to create a new Angular15 project

To create a new angular15 project, 1st we need to set up the system environment

Installing Visual Studio Code

We need an editor to create the application so for that we need to install VS code, it is easy to install and helps us to create an angular application easily. You can download Visual Studio Code from the following link.

Node.Js

Node.js is the open source, cross-platform javascript run time environment.

Go to https://nodejs.org/en/

And install the LTS version

Install the Package Manager

To install Angular and its dependencies, we now need to install Node Package Manager ( NPM).

NPM is the node.js package manager for JavaScript, which is automatically installed when we install node.js.

To see the version of NPM, run the below command on the Node.js command prompt like below

Node -v


Typescript

Go to the Node.js command prompt and install typescript using the below command

Npm install –g Typescript

Angular CLI (command line interface)

It is a tool that allows us to create a project using the command line argument.

So below is the command to create the latest angular project

npm install -g @angular/cli@latest

Once the above command runs successfully, now check the latest version of angular and run the below command

Ngversion

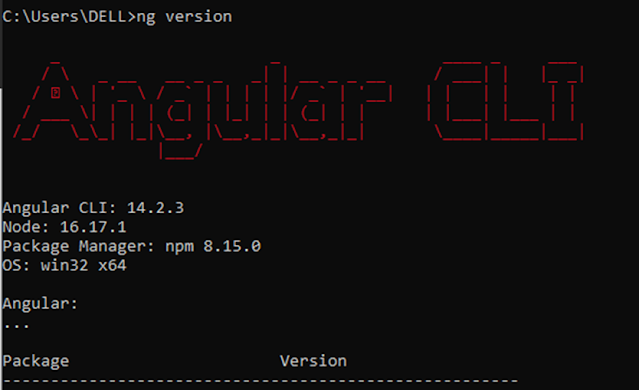
Since I was working already I angular 14 previously, so for me only I need to run the Angular CLI command.

Below is the image when my angular version is v14,


Now I ran below CLI command and then check the angular version like the below image

npm install -g @angular/cli@latest


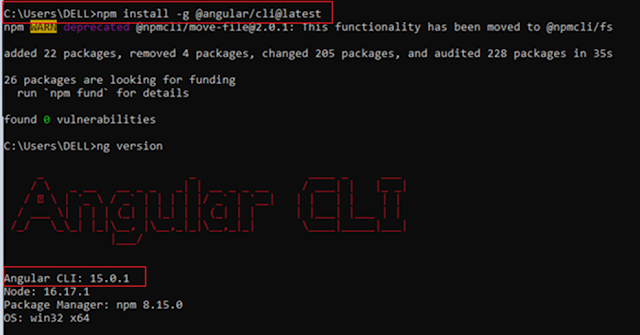
So this is the way we can upgrade the angular version to the latest version.

You can also install the older version of Angular as shown below,

  • MDAngular8
  • cdAngular8
  • npmi @angular/cli@8.3.8

Now to create an Angular15 application run the below command

Ng new Angular15App

Once you run the above command it will ask for installing routing like below, give Y and press enter


After that, it will ask to add CSS like the below,


Once you press enter, it will take a few minutes to create the Angular 15 Application.


So from above, we can see, the angular15 project creation is in progress.


From the above image, we can see, the angular 15 projects was created successfully.

After Creating this project, now let's open the VS code, go File tab then select the folder, and go to the directory where we created the angular15 project, from there, select the angular15 project folder. Once you will load the project, you will see all files in VS code.

Now run the ng serve –o command, 

 If you face an error like below then delete ng.ps1 file

PS C:\Users\DELL\Angular15App> ng serve -o

ng : File C:\Users\DELL\AppData\Roaming\npm\ng.ps1 cannot be loaded. The file C:\Users\DELL\AppData\Roaming\npm\ng.ps1 is not digitally signed.

You cannot run this script on the current system. For more information about running scripts and setting execution policies, see

about_Execution_Policies at https:/go.microsoft.com/fwlink/?LinkID=135170.


Then follow the below points then run ng serve –o again,

  • Delete ng.ps1 from the directory C:\Users\% usernam%\AppData\Roaming\npm\
  • Try to clear the npm cache directory C:\Users\%usernam%\AppData\ Roaming\npm-cache\

Note:- Sometimes without clearing the cache also, the above error is resolved.


Now run the ng serve –o command, Again, you will see output like below


Now to verify that this application is created in Angular15, just go to the package.json file and see all the libraries are in v15 like below.


To build the application below is the command 

ng build

To run the application below is the command

ng serve

after serving the application, go to the browser and enter the below URL, this is the default URL where the angular application run.

http://localhost:4200/

If you are looking Practically, then see the below video,


-------------------------------------------------------------------

Angular 15 New Features | Angular v15 is now available!

After the releasing Angular 14 this year, now Angular 15 is released this month (November 2022) with a couple of features including performance improvement. Previously we saw a new feature added to Angular 14. The released Angular 15 version is a stable version.
In this article, we are going to discuss the new feature added to Angular 15.


Angular 15 new features

  1. Stable Standalone Components API
  2. Standalone APIs to create a multi-route application
  3. Directive composition API
  4.  Image Directive (NgOptimizedImage) is now Stable
  5. Functional router guards
  6. The router unwraps default imports
  7. Better stack traces
  8. Stable MDC-based Components
  9. CDK Listbox
  10. Extended esbuild support


In this article, we are going to discuss the above Topics.

 
1.       Stable Standalone Components API

We see in Angular 14, the standalone APIs introduced to create angular applications without using the NgModules.
In Angular v15, standalone APIs are now stable after a couple of observation-like performances by the angular team.
In Angular v15, the Angular developer team achieved stability so now standalone components can work in sync with HttpClient, routers, Angular Elements, and more.
 
Standalone API allows us to bootstrap an application in a single component.
Here’s the code to do this:


import {bootstrapApplication} from '@angular/platform-browser';
import { StudentNameComponent } from './StudentName/StudentName.component';
@Component({
  standalone: true,
  selector: 'student-Names',
  imports: [StudentNameComponent],
  template: `
    … <student-grid [stdNames]="stdNamesList"></student-grid>
  `,
})
export class Angular15AppComponent {
  // component logic
}
bootstrapApplication(Angular15AppComponent);


Using the imports function, we can also reference standalone directives and pipes.
 
We can now mark components, pipes, and directives as “standalone: true” – now, no need to declare them into NgModule, else the Angular compiler will throw an error.
We can now import NgModule directly inside the standalone component by using import: [module_name].


2. Standalone APIs to create a multi-route application
Now we can build the multi-route application using the new router standalone APIs.

export const appRoutes: Routes = [{
    path: 'lazy',
    loadChildren: () => import('./lazy/lazy.routes')
      .then(routes => routes.lazyRoutes)
   }];

Where lazyRoutes are declared in

import {Routes} from '@angular/router';
import {LazyComponent} from './lazy.component';
export const lazyRoutes: Routes = [{path: '', component: LazyComponent}];

and now, register the appRoutes in the bootstrapApplication call 

bootstrapApplication(AppComponent, {
    providers: [
      provideRouter(appRoutes)
    ]
  });


here  provideRouter API is the tree-shakable.
At the build time, Bundlers can remove unused features from the router that reduce around 11% of code bundle size.

3. Directive composition API


This feature is implemented because of a feature request created on GitHub for adding the functionality to add directives to the host element.
it helps us in code reusability and it also allows developers to increase host elements with the directives and build the angular application with the help of code reusability, and it is possible with the help of the angular compiler.
The directive composition APIs only work with the standalone directives

@Component({
    selector: 'mat-menu',
    hostDirectives: [HasColor, {
      directive: CdkMenu,
      inputs: ['cdkMenuDisabled: disabled'],
      outputs: ['cdkMenuClosed: closed']
    }]
  })
  class MatMenu {}


in the above code, we enhance MatMenu with the 2 directives called HasColor and CdkMenu.
MatMenu helps us to reuse all the inputs, outputs, and related logic with HasColor and only logic and the selected input from the CdkMenu.


4. Image Directive (NgOptimizedImage) is now Stable


The NgOptimizedImage was introduced in V14.2, which helps us to easily adapt for loading image performance.
Now in Angular v15, it is stable.  Land’s End worked with this feature and introduced a 75% improvement in LCP (Largest Contentful Paint) in a lighthouse lab test for image loading.


previous version NgOptimizedImage having many features and functionalities, 
Now Angular v15 updates added a couple of new features in the image directive.

  1. Automatic srcset Generation: this directory automatically generates the srcset, which helps us to upload an appropriately sized image whenever requested. This reduces the download time of an image.

  1. Fill Mode [experimental]: this mode removes the need for declaring image dimensions and fills the image to its parent container. This mode is useful when we don't know the image dimensions we need to migrate the CSS background image to make use of this directive.

with the use of NgOptimizedImage directive, We can directly use NgOptimizedImage directive in angular component or NgModule

import { NgOptimizedImage } from '@angular/common';

// Include it into the necessary NgModule
@NgModule({
 imports: [NgOptimizedImage],
})
class AppModule {}

// ... or a standalone Component
@Component({
 standalone: true
 imports: [NgOptimizedImage],
})
class MyStandaloneComponent {}

when we are working with NgOptimizedImage  directive within a component, then we need to replace the image src attribute with the ngSrc.

5. Functional router guards
With the help of tree-shakable standalone router APIs, we work on reducing the boilerplate in the guards.

@Injectable({ providedIn: 'root' })
export class MyGuardWithDependency implements CanActivate {
  constructor(private loginService: LoginService) {}

  canActivate() {
    return this.loginService.isLoggedIn();
  }
}

const route = {
  path: 'somePath',
  canActivate: [MyGuardWithDependency]
};

here LoginService implements most of the logic and in the guard we only invoke isLoggedIn(). Even though the guard is pretty simple, we have lots of boilerplate code.
Now with the new functional router guards, we can refactor the code like below.


const route = {
    path: 'admin',
    canActivate: [() => inject(LoginService).isLoggedIn()]
  };

we created the entire guard in the guard declaration. The best thing about Functional Guards is that they are compostable.
 You can find an example of running router guards serially on GitHub.

6. The router unwraps default imports

To make the router simpler and reduce boilerplate further, the router now auto-unwraps default exports when lazy loading.

Let’s suppose you have the following LazyComponent:


@Component({
    standalone: true,
    template: '...'
  })
  export default class LazyComponent { ... }

Before this change, to lazy load a standalone component you had to:


{
    path: 'lazy',
    loadComponent: () => import('./lazy-file').then(m => m.LazyComponent),
  }

Now the router will look for a default export and if it finds it, use it automatically, which simplifies the route declaration to:


{
    path: 'lazy',
    loadComponent: () => import('./lazy-file'),
  }


7. Better stack traces


In Angular v15, now we can easily trace the code, it helps us when we face any error, so using stack trace we can find the place where the error is coming.


ERROR Error: Uncaught (in promise): Error
Error
   at app.component.ts:18:11
   at Generator.next (<anonymous>)
   at asyncGeneratorStep (asyncToGenerator.js:3:1)
   at _next (asyncToGenerator.js:25:1)
   at _ZoneDelegate.invoke (zone.js:372:26)
   at Object.onInvoke (core.mjs:26378:33)
   at _ZoneDelegate.invoke (zone.js:371:52)
   at Zone.run (zone.js:134:43)
   at zone.js:1275:36
   at _ZoneDelegate.invokeTask (zone.js:406:31)
   at resolvePromise (zone.js:1211:31)
   at zone.js:1118:17
   at zone.js:1134:33

So angular v15 developer team introduce this feature to trace more of a development code than showing libraries it calls.
In the previous version we have to give a lot of time to trace the error, but in v15 is easy to trace.
Below is the snippet for previous error indications:


  1. above error message coming from third-party dependencies (Angular framework, zone.js, and RxJS)
  2. we can see here no information was given about which user interaction encountered this bug. 

Now in Angular v15 stack trace will be like below

ERROR Error: Uncaught (in promise): Error
Error
   at app.component.ts:18:11
   at fetch (async)
   at (anonymous) (app.component.ts:4)
   at request (app.component.ts:4)
   at (anonymous) (app.component.ts:17)
   at submit (app.component.ts:15)
   at AppComponent_click_3_listener (app.component.html:4)

8. Stable MDC-based Components

Previously it was hard to reflector component-based angular material, but now it is possible by using MDC (Material design component for web)

In v15, majorly the refactoring work has been done in the DOM and CSS parts. Following the new update on responsiveness, there will be some styles in the old Angular applications that need adjustments, especially in the case of CSS overriding internal elements of the migrated components.

In v15, the old implementation of each new component is now deprecated, but still available from a “legacy” import

For example, we can retrieve the old mat-button implementation by importing its legacy button module.


import {MatLegacyButtonModule} from '@angular/material/legacy-button';


More improvements in components

In angular v15 couple of the user, observations are implemented  — range selection support in the slider.

To get a range input use

<mat-slider>

  <input matSliderStartThumb>

  <input matSliderEndThumb>

</mat-slider>

Additionally, all components now have an API to customize density which resolved another popular GitHub issue.

You can now specify the default density across all of your components by customizing your theme:

@use '@angular/material' as mat;


$theme: mat.define-light-theme((

  color: (

    primary: mat.define-palette(mat.$red-palette),

    accent: mat.define-palette(mat.$blue-palette),

  ),

  typography: mat.define-typography-config(),

  density: -2,

));


@include mat.all-component-themes($theme);

The new versions of the components include a wide range of accessibility improvements, including better contrast ratios, increased touch target sizes, and refined ARIA semantics.


9. CDK Listbox

CDK stands for Component Dev Kit gives different behavior primitives and helps in creating UI components. 

In the Angular v15, a new primitive called CDK Listbox was added, which helps developers to customize Listbox interactions drawn up by the WAI-ARIA Listbox pattern based on requirements..

CDK Listbox

Here, the behavioral interactions include keyboard interactions, bidi layout support, and focus management. No matter which one of them you use, each directive comes up with associated ARIA roles with respective host elements.

10. Extended esbuild support


In v14 having support for esbuild in ng build which enables faster build times and simplifies the pipeline.

Now v15 has experimental Sass, SVG template, file replacement, and ng build --watchsupport! 

Update esbuild in  angular.json 

From

"builder": "@angular-devkit/build-angular:browser"

to:

"builder": "@angular-devkit/build-angular:browser-esbuild"


------------------------------

.NET 7 Features | .NET 7 is Available Now | What 's new in .NET 7?

 In this article, we will discuss .NET 7 features. 


So recently Microsoft release .NET 7 which contains a performance improvement and new features in the below application.

  1. C# 11
  2. F# 7
  3. .NET MAUI
  4. ASP.NET Core/Blazor
  5. Web APIs, 
  6. WinForms
  7. WPF and more. 

With .NET 7, now we can containerize our .NET 7 application and set up CI/CD workflows in GitHub.

We can Download .NET 7 from here.

C# 11 Updates

NET 7 is released with the new feature of C# 11. if you want to see the full list of changes then see the list of new features in C# 11.

Generic Math Support

Generic math support is unlocked by the other new feature of C# 11, static abstract and virtual members, which might otherwise seem like a pretty obscure object-oriented programming (OOP) change. 

File-Scoped Types

You can use the file access modifier to create a type whose visibility is scoped to just the source file in which it is declared. This can help you avoid naming collisions.

Auto-Default Structs

All fields and auto-properties of a struct type are now automatically initialized to their default value if they are not set by the constructor.

UTF-8 String Literals

By default, C# strings are hardcoded to UTF-16, whereas the prevailing string encoding on the internet is UTF-8. To minimize the hassle and performance overhead of converting, you can now simply append a u8 suffix to your string literals to get them in UTF-8 right away:

You can specify the u8 suffix on a string literal to specify UTF-8 character encoding.

byte[] u8Span = "ABC"u8;
u8Span.ToArray().Should().BeEquivalentTo(new[] { 65, 66, 67 });

var u8 = "This is a UTF-8 string!"u8;

Required Members

The required modifier indicates that a field or property must be initialized either by the constructor method or by an object initializer statement used when calling the constructor.

public class Person
{
    public required string FirstName { get; init; }
    public string? MiddleName { get; init; }
    public required string LastName { get; init; }
}

It is now an error to create a Person without initializing both the required properties:

var person = new Person { FirstName = "Ada" }; // Error: no LastName!

Raw String Literals

Raw string literals are a new format for string literals that can contain arbitrary text, including whitespace, new lines, embedded quotes, and other special characters without requiring escape sequences. 

A raw string literal starts with three or more double quotes and ends with a matching number of double quotes. This can be great for JSON-formatted string data, as in the following example

A raw string literal is delimited by at least three double quotes:

var raw1 = """This\is\all "content"!""";
Console.WriteLine(raw1);

This prints:

This\is\all "content"!

Generic Attributes

You can now create a generic class that inherits from System. Attribute. This feature provides a more convenient syntax for attributes that require a Type parameter.

// Before C# 11:
public class TypeAttribute : Attribute
{
   public TypeAttribute(Type t) => ParamType = t;
   public Type ParamType { get; }
}

[TypeAttribute(typeof(string))]
public string Method() => default;
Using this new feature, you can create a generic attribute instead:


// C# 11 feature:
public class GenericAttribute<T> : Attribute { }
Then, specify the type parameter to use the attribute:

[GenericAttribute<string>()]
public string Method() => default;

Newlines in String Interpolation Expressions

The text inside the { and } characters for an interpolated string can now include new-line characters, allowing you to write more complex, multi-line C# expressions in your interpolated strings.

List Patterns

The very powerful pattern-matching feature in C# now includes array/list patterns.

C# 11 adds list patterns to the story. With list patterns, you can apply patterns recursively to the individual elements of list-like input – or to a range of them. Let’s jump right in with the generic algorithm from above, rewritten as a recursive method using list patterns:

T AddAll<T>(params T[] elements) where T : IMonoid<T> =>
    elements switch
{
    [] => T.Zero,
    [var first, ..var rest] => first + AddAll<T>(rest),
};
public static int CheckSwitch(int[] values)
    => values switch
    {
        [1, 2, .., 10] => 1,
        [1, 2] => 2,
        [1, _] => 3,
        [1, ..] => 4,
        [..] => 50
    };

WriteLine(CheckSwitch(new[] { 1, 2, 10 }));          // prints 1
WriteLine(CheckSwitch(new[] { 1, 2, 7, 3, 3, 10 })); // prints 1
WriteLine(CheckSwitch(new[] { 1, 2 }));              // prints 2
WriteLine(CheckSwitch(new[] { 1, 3 }));              // prints 3
WriteLine(CheckSwitch(new[] { 1, 3, 5 }));           // prints 4
WriteLine(CheckSwitch(new[] { 2, 5, 6, 7 }));        // prints 50

.NET MAUI Updates

In .NET 7, MAUI now has several new features, including a new Map control, better support for dual-screen devices, improvements to the UI responsiveness, faster startup, and better overall app size. Microsoft has also released a migration assistant for upgrading your Xamarin projects to .NET MAUI.

ASP.NET 7 Updates

With the web and web APIs still being at the center of so many modern applications, server-side ASP.NET is as important as ever. The ASP.NET team continues to make major investments into ASP.NET Core in .NET 7, including the handful of our favorite new features below:

Rate-Limiting Middleware

If you want to limit the traffic you get to a web application or API, you have a new option with rate-limiting middleware that controls the load on your application by queueing up traffic when it exceeds certain limits. This prevents other parts of your application from becoming a bottleneck.

MVC and Razor Pages

Microsoft hasn’t forgotten about server-side web applications, either. MVC and Razor pages got some improvements, like nullable models and a customized cookie consent value. You can read more about these changes on the Microsoft Learn site.

API Controllers

API controllers can now use the new decompression middleware to allow them to handle requests with compressed content. Controller classes also get better dependency injection support without the need to use the [FromServices] attribute.

Minimal APIs

We’re excited about Minimal APIs here at Trailhead. They are the new, low-code way to define web API endpoints in ASP.NET. 

Minimal APIs get some big improvements in .NET 7, including the addition of filters. This allows you to run code before or after your route handlers, or to inspect and modify your requests or responses. Other changes make unit tests easier to write for minimal APIs, add better support for the OpenAPI standard (formerly known as Swagger), and make streaming and file uploads easier.

Finally, minimal APIs built in .NET 7 will have new ways of defining routes in groups that share the same base path or other common configuration settings.

gRPC

A new transcoder middleware allows you to write gRPC services that also operate as RESTful JSON APIs. This allows you to use the latest and greatest web service technologies while still providing backward compatibility for clients who haven’t been upgraded to use gRPC.

Performance

Output caching is a new middleware in .NET 7 which stores responses from a web app and serves them from a cache. 

HTTP/3 is also now fully supported, and Kestrel can handle HTTP/2 traffic much faster than it used to in .NET 6.  There is even new support for running SignalR WebSockets over HTTP/2, something that we’ve sorely missed in previous versions.

You can read more about the many great performance improvements for ASP.NET Core in .NET 7 here.

Other

There is new and improved console output for the Dotnet watch now. The developer exception page in ASP.NET has a dark mode in .NET 7. If you prefer to use Program.Main instead of top-level statements, there’s a Dotnet new command-line switch for that. Also, Dotnet new includes new React and Angular starter templates, and the Dotnet command-line interface includes new tooling for JWTs.

Cloud Native and Containers

Our .NET applications have been able to run in containers for a long time now, but with .NET 7, Microsoft has added support for creating containerized applications as part of a build-publish process, with no need for an explicit Docker build phase.

With so many cool new features, we suspect many of you will be as eager as we are to incorporate .NET 7 into your projects. 

ARM64 Support

These days ARM processors are getting more and more common because of their high performance and low power consumption. With this release, .NET now fully supports targeting the ARM architecture.

Conclusion

If you are planning to work with  .NET 7, then we would like to tell Microsoft follows the tick-tock pattern with all .NET versions. 

All even-numbered versions come under long-term support (LTS) and all odd-numbered versions come under standard-term support (STS), which is almost 18 months. 

Because .NET 7 is the odd version number, it is an STS release. You should only upgrade if you also plan to upgrade your code again in about a year when .NET 8 comes.


-----------------------------------------------------