In this Article we will see how to build a minimal .NET 6.0 API from scratch with a example endpoints/routes.
The completed API starter project is available on GitHub at https://github.com/cornflourblue/dotnet-6-minimal-api.
Prerequisites Required to Develop .NET 6.0 APIs
To develop, run and test .NET 6.0 APIs download and install the following:
- .NET SDK - includes the .NET runtime and command line tools
- Visual Studio 2019 - if you are creating API using visual studio, it is a free code editor / IDE that runs on Windows, Mac and Linux.
- Visual Studio Code - it is a free code editor / IDE that runs on Windows, Mac and Linux.
- C# extension for Visual Studio Code - adds support to VS Code for developing and debugging .NET applications
- Postman - a GUI based API client for testing.
Create the project file
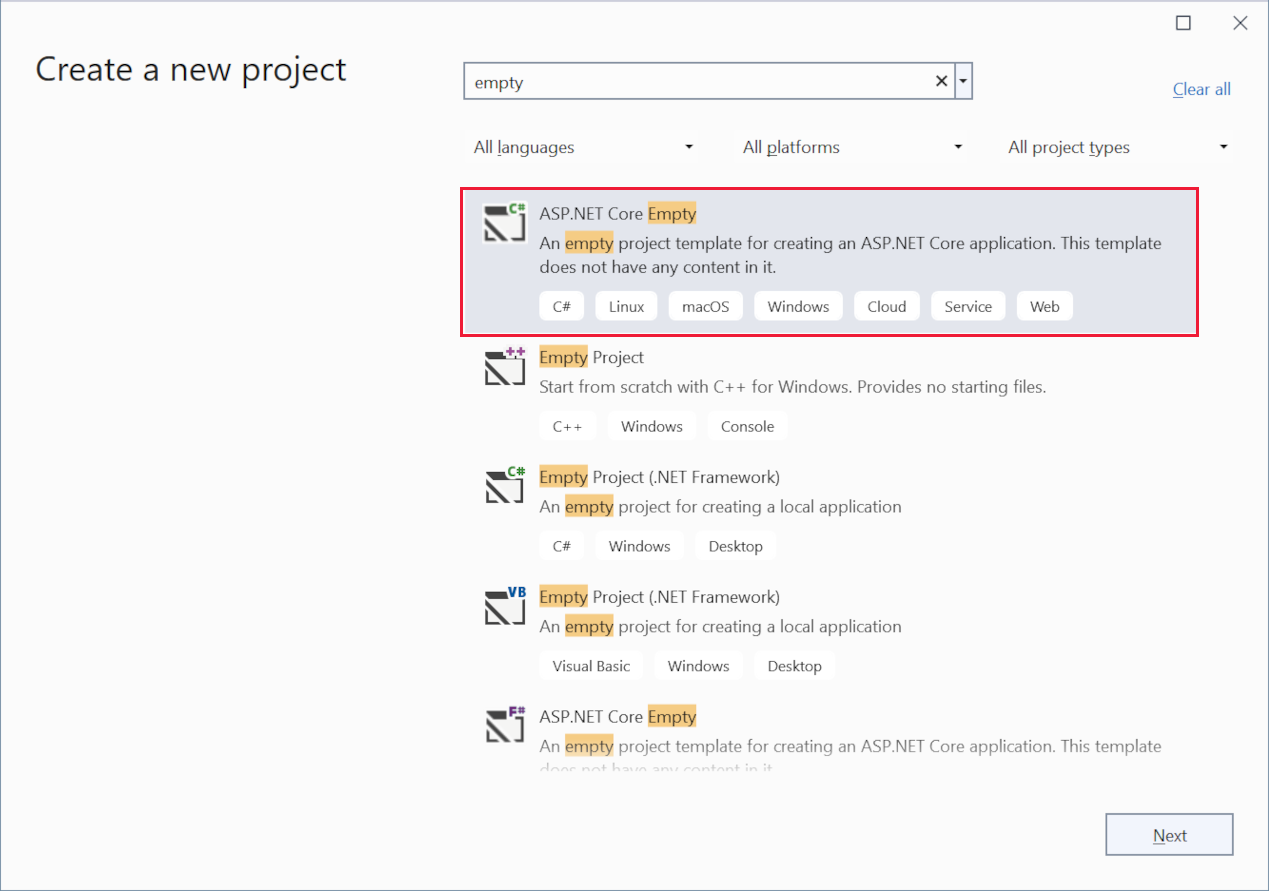
- Start Visual Studio 2022 and select Create a new project.
- In the Create a new project dialog:
- Enter API in the Search for templates search box.
- Select the ASP.NET Core Web API template and select Next.
- Name the project MinimalWebApi and select Next.
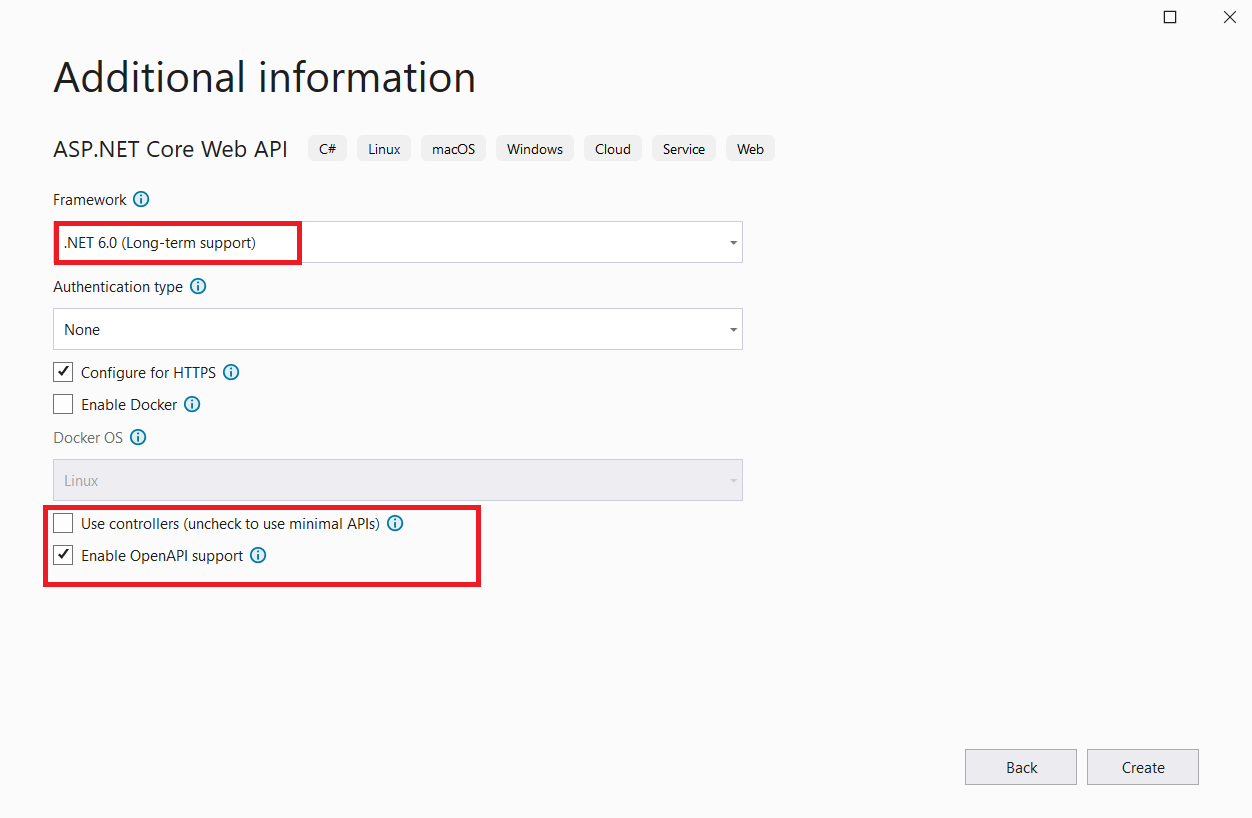
- In the Additional information dialog:
- Select .NET 6.0 (Long-term support)
- Remove Use controllers (uncheck to use minimal APIs)
- Select Create
 Create a new folder for the project named MinimalWebApi
<Project Sdk="Microsoft.NET.Sdk.Web">
    <PropertyGroup>
        <TargetFramework>net6.0</TargetFramework>
        <ImplicitUsings>enable</ImplicitUsings>
    </PropertyGroup>
</Project>
Create MSBuild C# Project File (.csproj)
The .NET CLI uses the Microsoft Build Engine (MSBuild) to build .NET projects. A .NET project file is an XML document containing MSBuild code that executes when you run the command dotnet build, and has a file extension based on the programming language used in the project (e.g. .csproj for C#, .fsproj for F#, .vbproj for VB etc).
There is a lot more to MSBuild than I can cover in this post, for full documentation see https://docs.microsoft.com/visualstudio/msbuild/msbuild.
SDK style projects
When .NET Core was released, a new type of MSBuild project called an SDK style project was also released to simplify project files and make them much smaller. Traditionally ASP.NET projects had large and complex MSBuild project files that were managed automatically by the Visual Studio IDE, but Visual Studio isn't required for .NET Core or .NET 5.0+ projects so the new format was created to make it easier to understand and edit the files by hand.
SDK style project files are simplified because the MSBuild complexity is encapsulated in an SDK which contains a set of MSBuild properties, items, targets and tasks for building the project, all you need to do is reference the SDK for your project type.
For more info on SDK style projects see https://docs.microsoft.com/dotnet/core/project-sdk/overview.
Project file details
The <Project> element is the root element of an MSBuild project file, the Sdk attribute tells MSBuild that this is an SDK style project and specifies that it's a .NET Web App with the value Microsoft.NET.Sdk.Web.
The <TargetFramework> element creates an MSBuild property named TargetFramework with the value net6.0 to configure the build for the .NET 6.0 framework. Properties in MSBuild are key/value pairs like variables in other programming languages, they are declared by adding child elements to a <PropertyGroup> element.
The ImplicitUsings feature is enabled which tells the compiler to auto generate a set of global using directives based on the project type, removing the need to include a lot of common using statements. The global using statements are auto generated when you build the project and can be found in the file /obj/Debug/net6.0/MinimalWebApi.GlobalUsings.g.cs.
Create .NET Program.cs with top-level statements
The .NET 6 Program file contains top-level statements which are converted by the new C# 10 compiler into a Main() method and class for the .NET program. The Main() method is the entry point for a .NET application, when an app is started it searches for the Main() method to begin execution. The top-level statements can be located anywhere in the project but are typically placed in the Program.cs file, only one file can contain top-level statements within a .NET application.
Program class details
The WebApplication class handles app startup, lifetime management, web server configuration and more. A WebApplicationBuilder is first created by calling the static method WebApplication.CreateBuilder(args), the builder is used to configure services for dependency injection (DI), a WebApplication instance is created by calling builder.Build(), the app instance is used to configure the HTTP request pipeline (middleware), then the app is started by calling app.Run().
I wrapped the add services... and configure HTTP... sections in curly brackets {} to group them together visually, the brackets are completely optional.
Internally the WebApplicationBuilder class calls the ConfigureWebHostDefaults() extension method which configures hosting for the web app including setting Kestrel as the web server, adding host filtering middleware and enabling IIS integration. For more info on the default builder settings see https://docs.microsoft.com/aspnet/core/fundamentals/host/generic-host#default-builder-settings.
Create the Program class (If not exist)
- Create a new C# class file in the project folder named Program.cs ,if this file is not exist
- Copy the below C# code into the file and save
var builder = WebApplication.CreateBuilder(args);
{
var services = builder.Services;
services.AddControllers();
}
var app = builder.Build();
{
app.MapControllers();
}
app.Run();
Create .NET App Settings File (If not exist)
The appsettings.json file is the base configuration file in a .NET app that contains settings for all environments (e.g. Development, Production). You can override values for different environments by creating environment specific appsettings files (e.g. appsettings.Development.json, appsettings.Production.json).
Configuration values from the app settings file are accessed with an instance of IConfiguration which is available via .NET dependency injection (e.g. public MyConstructor(IConfiguration configuration) { ... }), the config values are retrieved by key (e.g. configuration["Logging:LogLevel:Default"]).
For more info on configuration in .NET see https://docs.microsoft.com/aspnet/core/fundamentals/configuration/.
App settings file details
The Logging section of the app settings file configures the LogLevel for a couple of selected categories (Default and Microsoft.AspNetCore). The LogLevel sets the minimum level of message to log for each category, the default level is Information so by default all messages of level Information or higher will be logged.
The setting "Microsoft.AspNetCore": "Warning" prevents a bunch of messages from being logged for each request to the API by setting the minimum log level to Warning for all categories that begin with Microsoft.AspNetCore.
For more info on logging in .NET see https://docs.microsoft.com/aspnet/core/fundamentals/logging/.
Create the app settings file
- Create a new file in the project folder named app.settings.json
- Copy the below JSON code into the file and save
{
    "Logging": {
        "LogLevel": {
            "Default": "Information",
            "Microsoft.AspNetCore": "Warning"
        }
    }
}
Create .NET Product Entity Class
Entity classes represent the core data of a .NET app, and are commonly used with an ORM such as Entity Framework to map to data stored in a relational database (e.g. SQL Server, MySQL, SQLite etc). Entities can also be used to return HTTP response data from controller action methods, and to pass data between different parts of the application (e.g. between services and controllers).
Product entity details
The Product entity class represents the data for a product in the application, it contains a minimal set of properties (just Id and Name) for testing the minimal API.
Create the Product class
- Create a new folder in the project folder named Entities
- Create a new C# class file in the Entities folder named Product.cs
- Copy the below C# code into the file and save
namespace MinimalWebApi.Entities;

public class Product
{
    public int Id { get; set; }
    public string Name { get; set; }
}
Create .NET Products Controller
Controller classes contain action methods that handle the HTTP requests sent to a .NET API. The MapControllers() method called in Program.cs above automatically creates HTTP endpoints for action methods of attribute routed controllers (controllers decorated with the [Route("...")] attribute. All public methods of a controller are called action methods.
Products controller details
The ProductsController class derives from ControllerBase, a built-in .NET base class for an API controller (basically an MVC controller without view support), it provides methods and properties for handling HTTP requests including Ok(), NotFound(), Request and Response. For more info on ControllerBase see https://docs.microsoft.com/aspnet/core/web-api#controllerbase-class.
The [ApiController] attribute enables a few features designed to simplify API development, including automatic model validation and HTTP 400 response on failure, and automatic inference of the binding source (location) of parameters based on parameter type and name (e.g. [FromBody], [FormQuery] etc). For more info see https://docs.microsoft.com/aspnet/core/web-api#apicontroller-attribute.
The [Route("[controller]")] attribute sets the route template to "[controller]" to use the controller name as the base route for all action methods (i.e. "/products"). For more info on attribute routing see https://docs.microsoft.com/aspnet/core/mvc/controllers/routing#attribute-routing-for-rest-apis.
The private _products variable contains a hardcoded list of products to enable testing of the GetAll() and GetById() action methods, in a real world application this data would usually come from a database or another type of data repository.
The GetAll() method uses the Ok() convenience method to return an HTTP 200 OK response with a list of all products. The [HttpGet] attribute constrains the method to only match HTTP GET requests, the attribute is used without a route template parameter so it matches the base path of the controller ("/products").
The GetById() method returns an Ok() response with the specified product if it exists, otherwise it returns NotFound() (HTTP response code 404 Not Found). The [HttpGet("{id}")] attribute constrains the method to HTTP GET requests matching the path /products/{id} (e.g. /products/1, /products/2 etc), the {id} path parameter is automatically bound to the int id parameter of the method.
The IActionResult return type represents various HTTP status codes such as 200 OK, 400 Bad Request, 404 Not Found etc. The Ok() method creates an implementation of IActionResult that produces a HTTP 200 OK response.
Create the ProductsController class
- Create a new folder in the project folder named Controllers
- Create a new C# class file in the Controllers folder named ProductsController.cs
- Copy the below C# code into the file and save
namespace MinimalWebApi.Controllers;

using Microsoft.AspNetCore.Mvc;
using System.Collections.Generic;
using MinimalWebApi.Entities;

[ApiController]
[Route("[controller]")]
public class ProductsController : ControllerBase
{
    private List<Product> _products = new List<Product>
    {
        new Product { Id = 1, Name = "Milo" },
        new Product { Id = 2, Name = "Tim Tams" }
    };

    [HttpGet]
    public IActionResult GetAll()
    {
        return Ok(_products);
    }

    [HttpGet("{id}")]
    public IActionResult GetById(int id)
    {
        var product = _products.Find(x => x.Id == id);
        if (product == null)
            return NotFound();

        return Ok(product);
    }
}
Launch .NET 6.0 API and Test with Postman
Postman is a great tool for testing APIs, you can download it at https://www.postman.com/downloads.
Start the API by running dotnet run from the command line in the project root folder (where the MinimalWebApi.csproj file is located), you should see a few console messages including Now listening on: http://localhost:5000. To enable hot reloading (restarting on file changes) use the command dotnet watch run.
NOTE: To find out how to easily launch the API in debug mode with VS Code see VS Code + .NET - Debug a .NET Web App in Visual Studio Code and skip to the step: Generate tasks.json and launch.json.
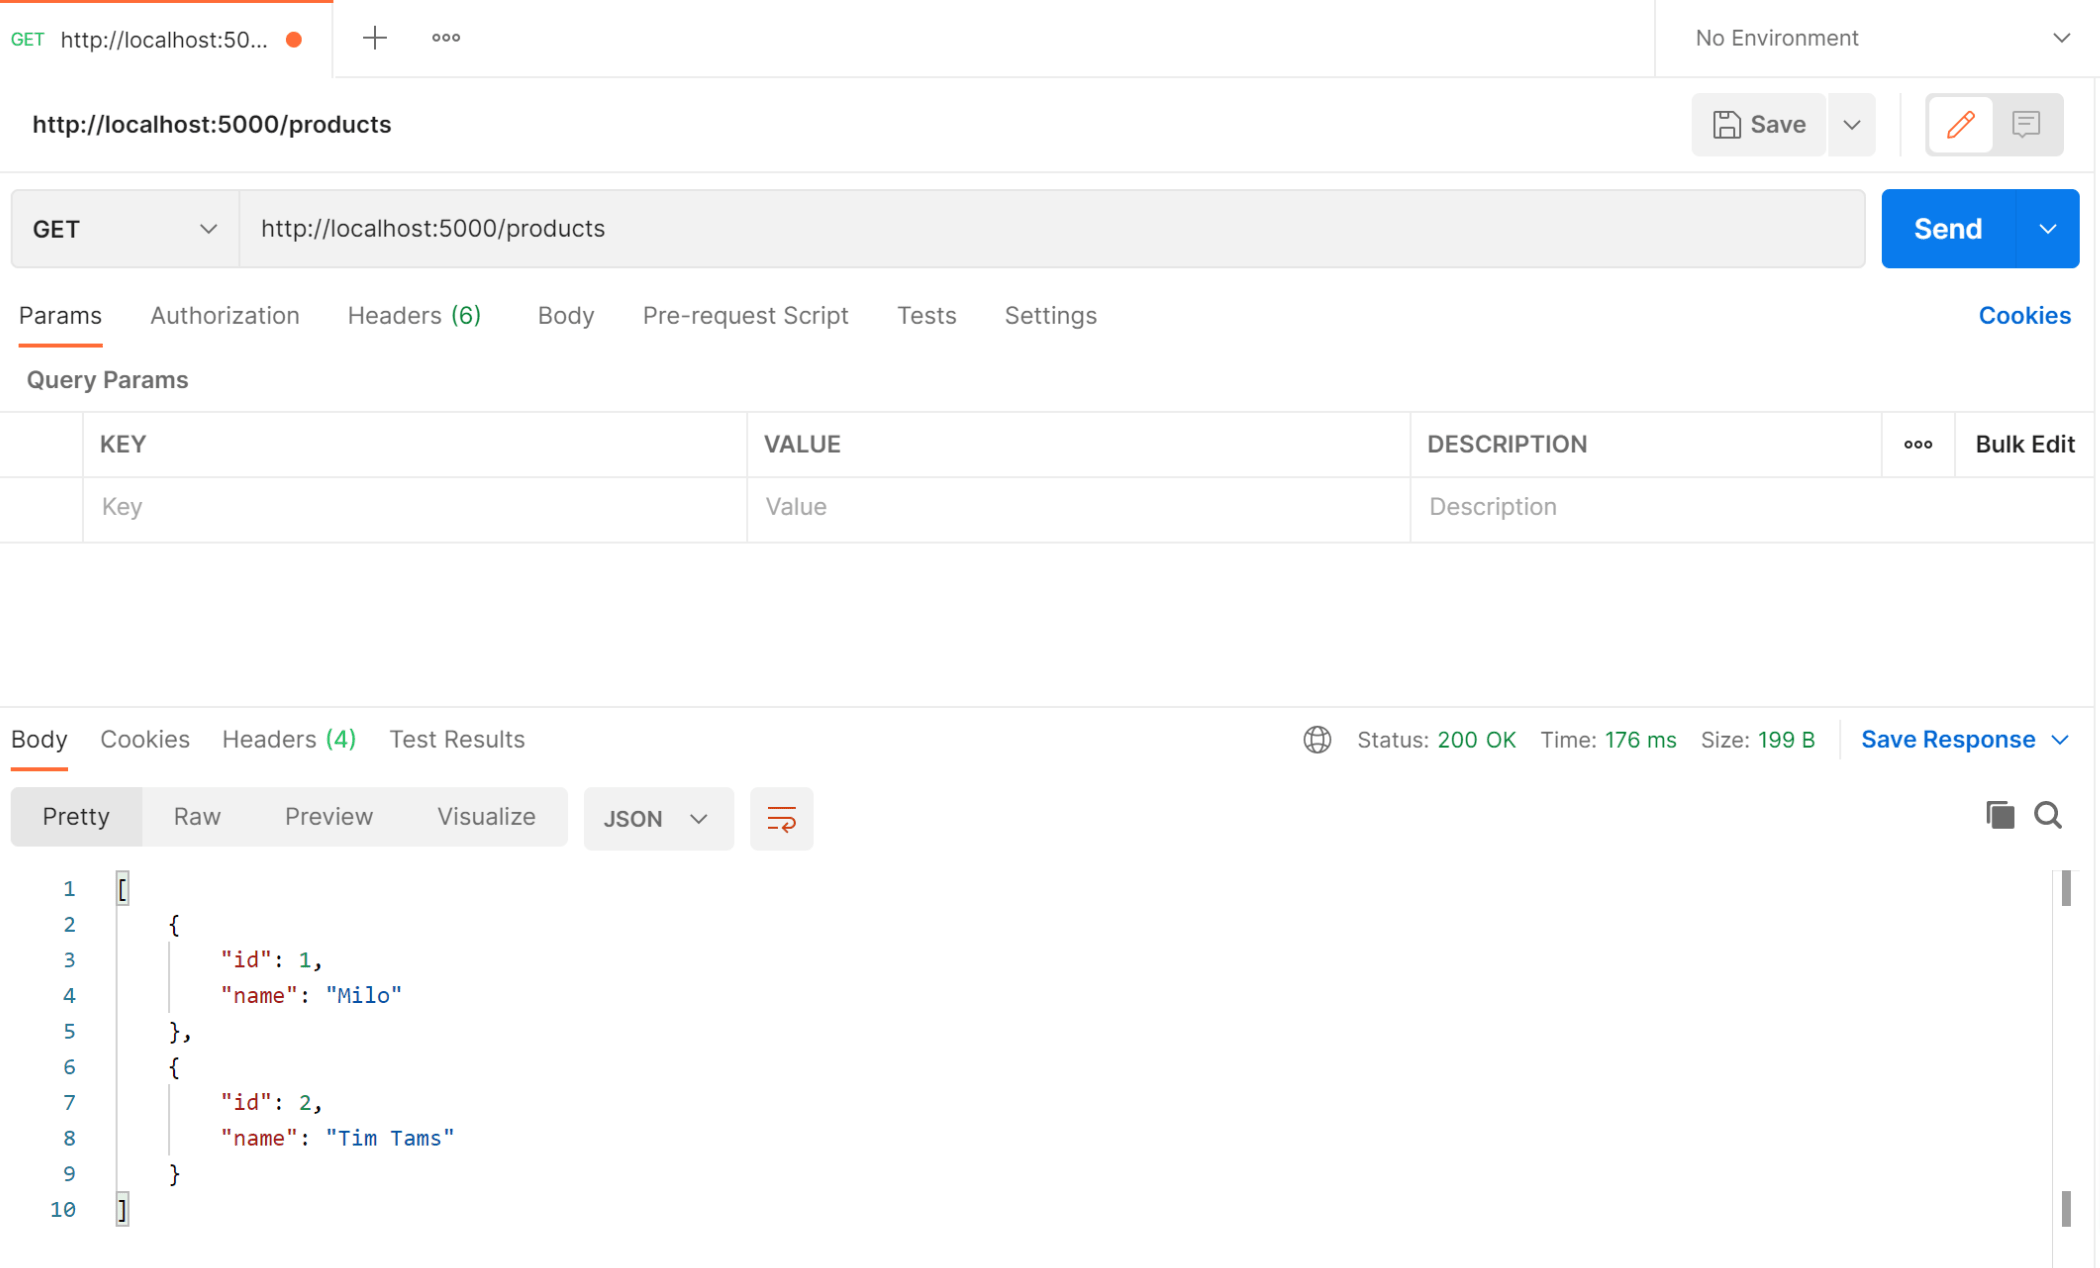
How to get all products from the .NET API
Follow these steps to fetch a list of all products from the API with Postman:
- Open a new request tab in Postman by clicking the plus (+) button at the end of the tabs
- Change the HTTP method to GET with the dropdown selector on the left of the URL input field
- In the URL field enter the address to the products route of your local API -
http://localhost:5000/products - Click the Send button, you should receive a "200 OK" response containing a JSON array with all the products in the API
Screenshot of Postman after the request:
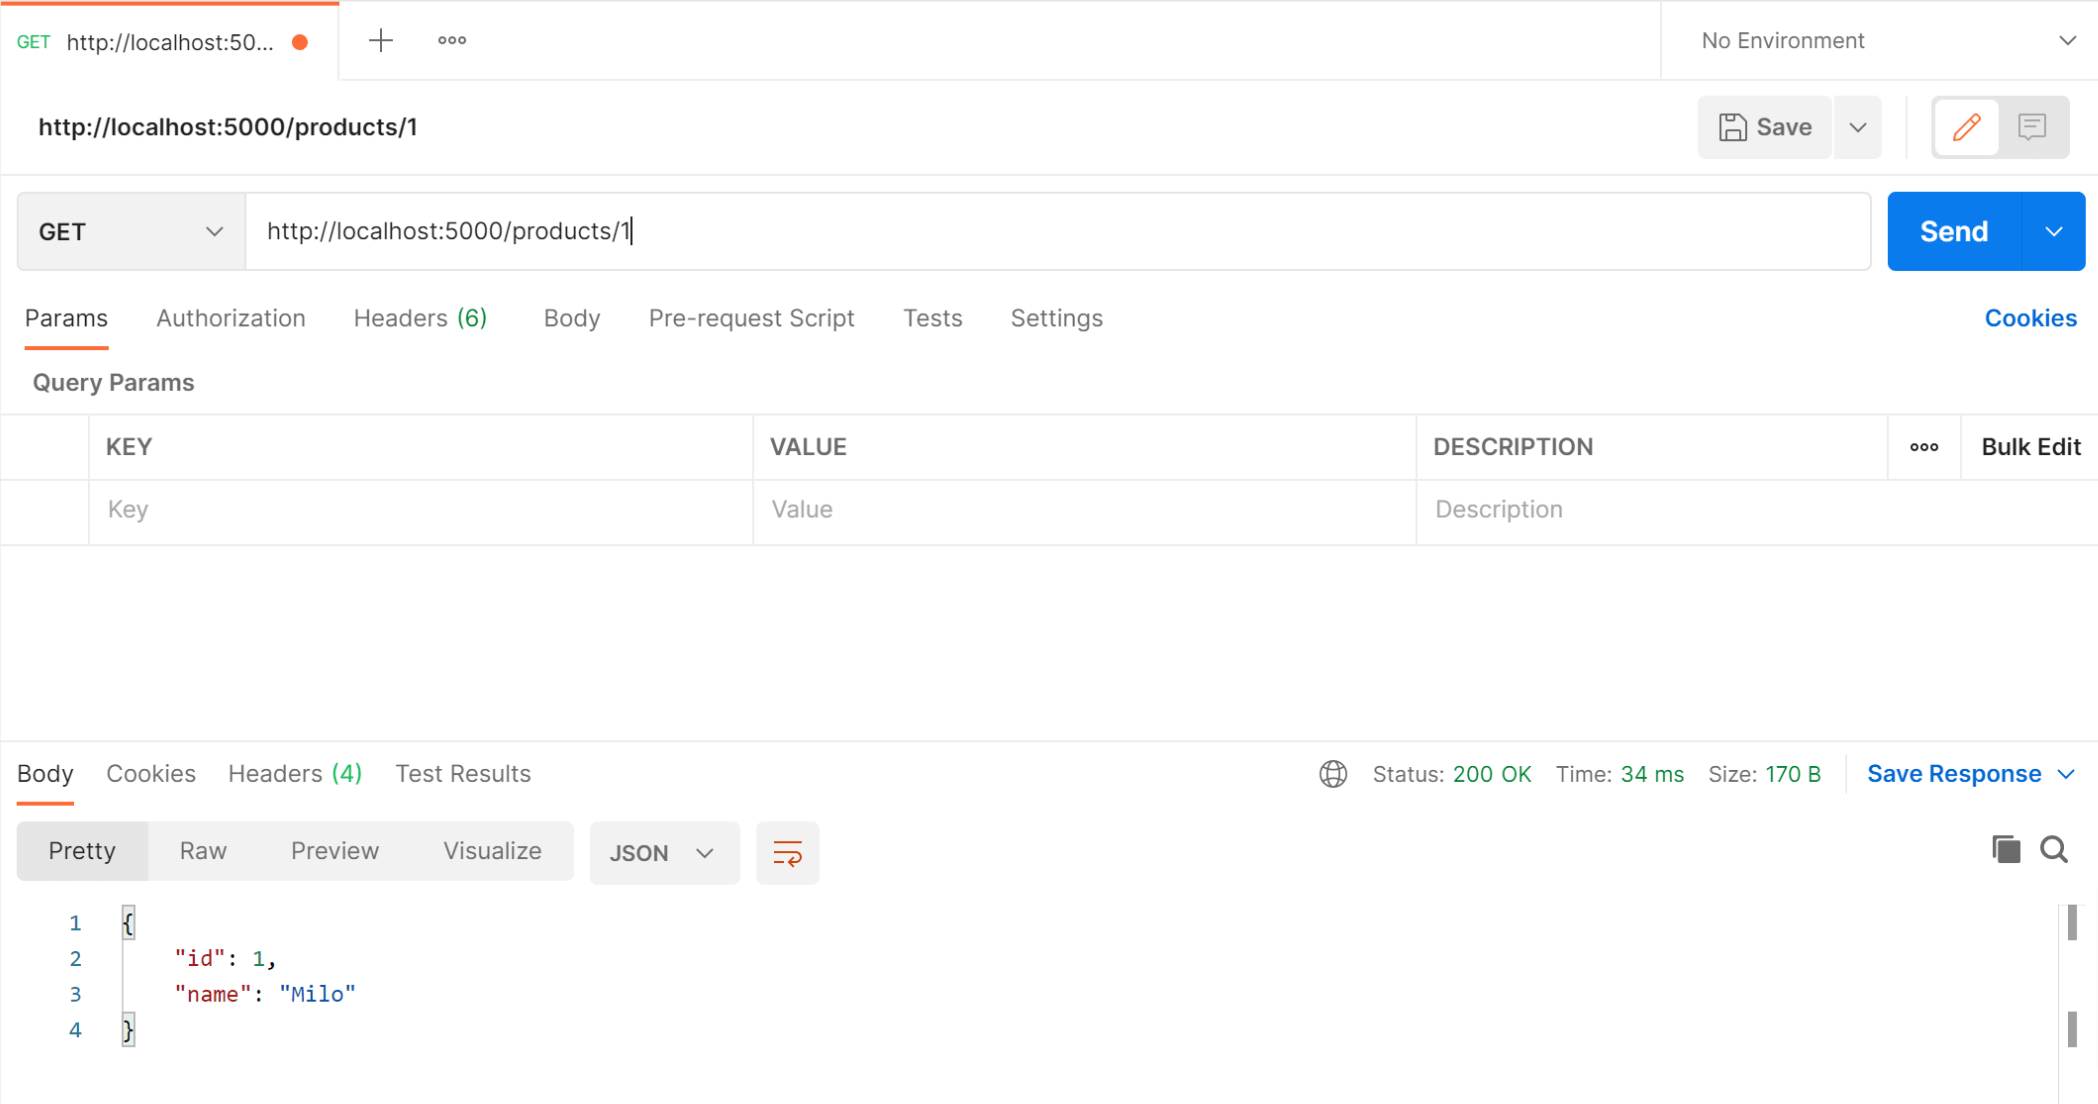
How to get a single product from the .NET API
Follow these steps to fetch a specific product from the API with Postman:
- Open a new request tab in Postman by clicking the plus (+) button at the end of the tabs
- Change the HTTP method to GET with the dropdown selector on the left of the URL input field
- In the URL field enter the address to the product details route of your local API -
http://localhost:5000/products/1 - Click the Send button, you should receive a "200 OK" response containing a JSON object with the specified product details
Screenshot of Postman after the request:
Differences between minimal APIs and APIs with controllers
No support for filters: For example, no support for IAsyncAuthorizationFilter,
IAsyncActionFilter, IAsyncExceptionFilter, IAsyncResultFilter, and
IAsyncResourceFilter.
• No support for model binding, i.e. IModelBinderProvider, IModelBinder. Support
can be added with a custom binding shim.
◦ No support for binding from forms. This includes binding IFormFile. We plan to
add support for IFormFile in the future.
• No built-in support for validation, i.e. IModelValidator
• No support for application parts or the application model. There's no way to apply
Reference taken from below link
https://jasonwatmore.com/post/2022/02/04/net-6-minimal-api-tutorial-and-example
------------------------------------------------------------------------------